So you want to be a hero participate in a stream with a virtual table?
If you haven’t read Part 1 of this DeskCamera + OBS article series, you’ll want to do that before reading any further or risk getting lost.

The great thing is that it doesn’t matter how you mix and match your content sources as a guest, DeskCamera can handle virtual tables, cabinet or no cabinet.
This article is using DeskCamera version 4.5.1 which is a newer version than the original article. There is a new feature that makes capturing screen areas significantly easier you’re going to want to take advantage of.
Before we get to the DeskCamera configuration, though, we need to get the virtual pinball software fully configured as a first step. This article is going to use Visual Pinball X as an example, although the general steps in this article could just as easily apply to PinballFX (Cabinet mode unlock recommended), Future Pinball, Pinball Arcade, or Microsoft Excel if you’re really into spreadsheets. No judgement.
No Cabinet VISUAL PINBALL CONFIGURATION
If you use a physical cabinet for your pinball configuration, you can likely skip this section since I’m guessing you already have your software ready to go.
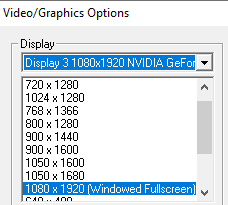
For those using a system without a dedicated pinball cabinet, I highly recommend connecting a monitor that can do 1920 x 1080 and can physically rotate to a portrait orientation. You’ll want to set your Microsoft Windows display preferences to match so that the display is actually in portrait mode as 1080 x 1920.
I don’t recommend laying a monitor on it’s side, but, you do you. You’ll see why this portrait mode is helpful below.
First, open the Preferences > Video/Graphics Options screen and select the portrait orientated display as the output (Display 3 in my case):
For the table itself, you’ll want to enable the Backglass and Options buttons on the left, and set your POV values to something like these:
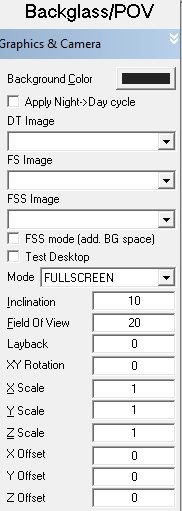
These POV settings work well, but feel free to mess around with them if you prefer. The inclination is going to change the overall “tilt” of the view over the table, and increasing the Field Of View option is going to have a fish-eye lens effect. Just go back to these starting values when things inevitably break and you can’t seem to fix it.
When you run a table with the POV settings above you should get a playfield output on the portrait display that looks something like this, approximating the overhead view that you see on your favorite pinball related streams:
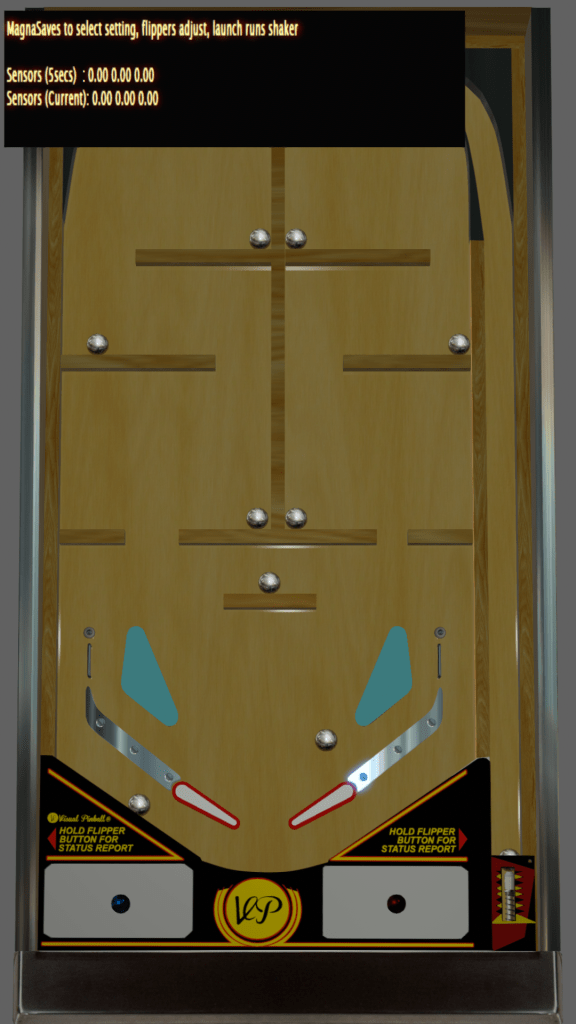
This is also why a portrait monitor is so helpful. As fun as it would be for everyone watching to see your head titled on cam while you play, it will get painful after a while.
Configuring Media Sources
You did read Part 1 so you already know what a Media Source is and why we need them, correct?
Fine, I’ll briefly recap, but then you need to go read the article.

A Media Source is the Audio/Video content that feeds into DeskCamera. All of your display and video hardware connected to your computer should get a Media Source automatically whenever you start DeskCamera. This includes computer displays, capture cards, and USB connected cameras.
DeskCamera creates a separate RTSP feed for each enabled Media Source. If there are Media Sources you don’t need, it’s best to turn them off to save system resources. To disable a Media Source, change the Live Controller option to “GDI”, click “Yes” for the reset to defaults pop-up, and finally clear out the Enable option.
Ultimately you’re going to want the same three Media Sources from Part 1: The player camera and audio, the playfield, and the DMD. Make sure your pinball software is running for the rest of the configuration process.
Here are the Media Source settings you’ll want to use for each of the final outputs:
Player Camera and Audio Media Source
Chances are you’re not going to have to do much since your camera source should be created for you automatically from your HDMI capture card or USB camera. Here are the Media Source settings to use:
- Rotation – None
- Audio – Select the appropriate audio mic source
- Video overlay – Disable
- Motion events – Disable
- Live controller – KS video device
After you are completed with the Media Source, click the Wrench icon next to the Live Controller option and make the following changes:
- Auto GOP: Disabled
- Manage by NVR: Disable (Click “yes” for the pop-up after changing)
- Video Encoder: H264
- Resolution: 1280 x 720
- FPS: Max the slider to 30, DeskCamera will broadcast at 60 FPS automatically if your camera and capture card support it.
- Bitrate: As close as you can get to 1024
- GOP: 60-100
- Audio Encoder: AAC
Playfield Media Source
For virtual tables, cabinet or not, the playfield should be handled by one of the auto-configured displays that will need to remain enabled.
- Rotation – If your playfield display uses a portrait orientation in Windows, select None. Otherwise, use the appropriate rotation amount and direction for your display configuration.
- Audio – Leave on Select Audio
- Video overlay – Disable
- Motion events – Disable
- Live controller – High performance
Next, click the Wrench icon next to the Live Controller option and make the following changes to the MainStream option:
- Auto GOP: Enabled
- Manage by NVR: Disable (Click “yes” for the pop-up after changing)
- Video Encoder: H265 if your system supports it, otherwise use H264.
- Resolution: 720×1280
- FPS: Max slider to 60, ignore the red text and hover warning
- Bitrate: As close as you can get to 4096
- GOP: (Automatically set)
DMD Media Source
DMDs are slightly trickier because you might have a dedicated LCD display in a cabinet, a real plasma or LED based DMD, or it could just be some portion of a display. The next two sections outline how to configure your DMD Media Source, just use whichever one is appropriate based on your setup.
Dedicated Display
If you have a dedicated LCD display, you’ll use the appropriate auto-configured display option with these settings. For an actual plasma or LED DMD, you’ll need to do some sort of hardware based signal split or conversion to an HDMI source that you can capture with these same settings:
- Rotation – None
- Audio – Leave on Select Audio
- Video overlay – Disable
- Motion events – Disable
- Live controller – GDI
Click the Wrench icon again and use these MainStream options:
- Auto GOP: Disabled
- Manage by NVR: Disable (Click “yes” for the pop-up after changing)
- Video Encoder: H264
- Resolution: 640×480, or the lowest resolution available
- FPS: 25-30
- Bitrate: Lowest slider setting of 512
- GOP: 60-100
Screen Area
Physical DMD displays have a 4:1 resolution ratio, usually 128 x 32 “pixels” in size. If it is an option, I would recommend setting the DMD output in your pinball software to 256 x 64 . You can go with a larger resolution if you want, just keep in mind it will increase your upload bandwidth requirements.
From the Video & Audio Settings section of DeskCamera, you will need to add a new screen area Media Source by clicking the Add New Media Source button. It looks like a plus sign inside a circle.
After clicking the Add New Media Source button, leave the default radio button set to Screen Area, enter something like DMD for the name, and select the correct display screen number where your DMD resides. After that, click the Setup button which will bring up a gray movable selection window. Make sure the upper left corner of the gray selection window lines up fairly close to the upper left of the DMD, it doesn’t have to be exact. Resize the selection box size as small as you can and click the Ok button in the upper right corner of the screen. The resize controls might be slow to respond sometimes, just do the best you can to get the window size smaller.
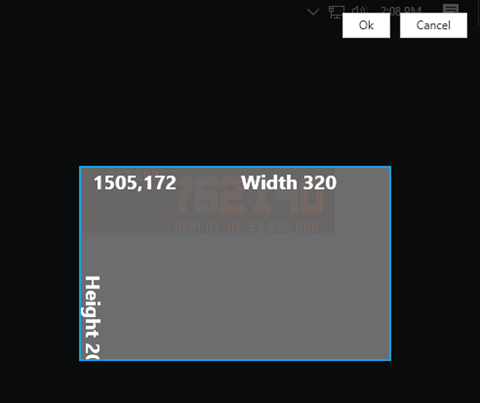
The DMD setup should look something like this after clicking OK for the selection:

Next, click in the Area Size boxes, and type in the correct pixel size values for the DMD display, horizontal/X on the left, and vertical/Y on the right. Next, click the ok button and your screen capture Media Source is created. Here are the rest of the settings to check:
- Rotation – None
- Audio – Leave on Select Audio
- Video overlay – Disable
- Motion events – Disable
- Live controller – GDI
Click on the wrench icon one last time, and use the following settings under the MainStream option:
- Auto GOP: Disabled
- Manage by NVR: Disable (Click “yes” for the pop-up after changing)
- Video Encoder: H264
- Resolution: (Fixed to your screen area size)
- FPS: 25-30
- Bitrate: Lowest slider setting of 512
- GOP: 60-100
Final Tests
I highly recommend making sure your configuration is working correctly for your content before passing along any links. You can do this on the Video & Audio Settings section using the “Test RTSP” button on each enabled Media Source, selecting the MainStream option name. Clicking OK in the DeskCamera pop-up window will shut down the preview and command prompt windows.
You’ll likely need to move the DMD on-screen a little bit to make sure it’s lined up correctly with the capture area, and possibly adjust the resolution. Also note that DeskCamera is going to broadcast whatever is on your display, we use this to display time.is browser windows prior to streams to coordinate time delays on the host.
Once your testing is done, you can start your DeskCamera streams and get the public URLs to share using the same whatismyip.com website and steps outlined in Part 1.

Want to checkout the above stream which used DeskCamera from both participants and followed the virtual pinball process above? https://www.twitch.tv/videos/635118136
That’s a wrap
Well, looks like this is it for my guest blog posts. Thanks again to George at Don’t Panic Flip for hosting my recent duels, it’s been a ton of fun and great to see a pinball resurgence. Hopefully Part 1 and 2 have been helpful getting you going with your own online pinball duels.
Have fun, stay safe, and be good or be good at it.
See you next Flipstream…
