by Bryan from Flipstream
As a part of the “How to Stream with Other Streamers” series, next up is OBS and DeskCamera. But why even look into other technologies when NGINX worked so well!?
George outlined a lot of technical challenges with NGINX, including multiple layers of encoding and decoding induced delay, and some scene constraints in the RTMP/NGINX methodology. Remote guests need to have a very specific scene layout that is coordinated with the host, the host and all guests need to ensure they sync on scene changes, and cutting out visibility on a stream may stop it from working completely.
Also, it needs some newspapers and dog poop? I still don’t quite get how my dogs or their poop are involved. To be honest, I’m not sure I want to know.

Anyways, this guide outlines a new method using DeskCamera, it’s off-the-shelf software typically used in the security camera space but worked just fine for streamers to provide content to a streaming host using RTSP instead of RTMP which brings the following benefits to the table:
- A very stable setup
- Sub-second delay from guest to host is very possible, typical range between .5s – 1.5s delay
- Full scene configuration and scene transition freedom for the host
- No more puzzle pieces…
- “Hands off” streaming for guests
- No dog poop
“There are a few, uh, provisos. Ah, a couple of quid pro quo.”

This guide assumes that you have some working network knowledge around routing, ports, port forwarding, firewalls, and how to configure them on your equipment. To reiterate a similar proviso from OBS & NGINX: Part 1, networking topics are a very deep rabbit hole that I’m not looking to delve into any further than necessary. Essentially this guide is going to explain what needs to be done and it is up to the reader to know or find out how to do it on their equipment.
High Level OVERVIEW of RTSP Vs. NGINX and RTMP
Looking back at George’s OBS & NGINX Part 1 and OBS & NGINX Part 2, his method is for guests to use OBS to broadcast into a central NGINX server. The scenes for each guest and the host are designed to overlap and fit together like puzzle pieces in the hosts streaming software to form one cohesive screen. The host assembles the pieces in software and broadcasts the completed puzzle to their preferred streaming platform, Twitch in George’s case (Monday, Tuesday, and Thursday nights. Please remember to tip your server, and try the fish).
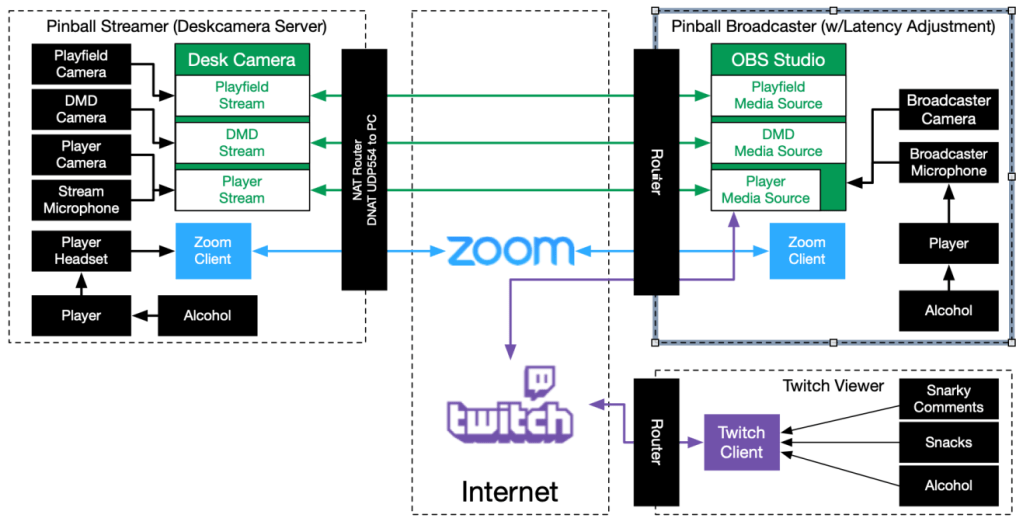
This newer process cuts out the middleman (Middlepeople? Middlepersons?) entirely and guests provide access to each individual component they’re streaming that the host can pull directly into their scene instead. These streams typically consist of the overhead view of the pinball machine’s playfield, DMD/LCD, and the player facing camera plus guest audio, each as a separate stream.
The host can then take these individual guest “pieces” and add them into as many of their scenes as they prefer. Because they are individual components, the host can resize, trim, and rearrange the guest content just like their own local content, plus switch scenes and layouts at will during the broadcast with no involvement needed from the guests or impact to the connections.
Ultimately, a singe guest and host layout will look something like this layout:
Network Configuration Requirements for Guests
As I noted earlier, the purpose of this section is only to outline the required network level changes to support this streaming guest method. You’ll need administrative access to the modem/router to perform these changes, so if you don’t have the login or your Internet Service Provider locks down access, you may be out of luck. I would also recommend having the administrative guide for your network equipment in hand or downloaded if you aren’t familiar with it already.
The first step is to establish port forwarding on your modem/router that handles your main Internet connection to reroute stream requests to the computer running DeskCamera. To do this, you’ll need to setup port forwarding for TCP and UDP traffic incoming on port 554 from the public internet to the internal IP address of the computer hosting DeskCamera.

In most cases, you’ll need a rule in your router’s firewall configuration to allow traffic from the Interwebs into your network, commonly referred to as poking a hole in the firewall. Presumably, the default firewall configuration is taking the paranoid route of blocking all incoming traffic. To open the port, you need to add or modify the current firewall rules to allow new and established TCP traffic from port 554 through the firewall to the DeskCamera IP address and matching TCP 554 destination.
Note: You can use alternate ports on either side if you like, although I would recommend sticking to 554 for simplicity sake unless you know what you’re doing. The rest of this guide is going to assume it’s all port 554.
If your router has a wizard style setup for port forwarding that makes firewall changes for you, I would still recommend double checking your firewall settings to make sure they are correct. If you use DHCP, you may also want to consider a reserved DHCP address or assigning a static IP address outside of the DHCP range for the machine hosting the guest content. This avoids having to make changes to your router’s port forwarding and firewall configuration every time your internal system’s IP changes. Otherwise, opening a Command Prompt window and using the command “ipconfig” on the DeskCamera system should get you the current internal IP address for port forwarding and firewall config. Usually starting with 192.168.x.x, or 10.x.x.x as the address.

Finally, you’ll need to make sure that any software firewalls running on the DeskCamera system are also modified to allow TCP and UDP 554, or add the DeskCamera main executables to a whitelist after it is installed. This includes Microsoft Windows Defender as well as any other Anti-Virus/Security applications the system is running.
The last piece of the networking setup is understanding your public IP address. This is vital information to collect since this will determine the RTSP link. The easiest way to get this information is to go to www.whatismyip.com and grab the IP address under the “My Public IPv4 is: <numbers you need to write down for later>” line near the top of the page, usually as close to the start time of the host’s stream in case the value changes.
Using a dynamic DNS service is optional, although they allow you to setup an easy to remember domain name instead of having to manage IP addresses. If your router doesn’t support dynamic DNS update services, you’ll need to run software on a computer inside your network that keeps the dynamic DNS service updated with any public IP changes.
Okay, that’s it for the technical networking portion of this program. Now onto the less fun stuff!
General RTSP REQUIREMENTS
The quality of the streams you produce are constrained by your upload bandwidth of your Internet connection. You’re going to need at least 6-8 Mbit/sec consistently upstream. More is better, and I’m not sure I’d attempt this with anything less than my terrible 10 Mbit/sec upstream connection. As a guest, you have the power responsibility of creating three streamed components, and you’re free to use whatever sources you like. It can be any mix of IP cameras, HDMI cameras and capture cards, USB connected cameras/webcams, or even screen captures.
I will say that IP cameras that produce RTSP streams on their own like security cameras, or cameras that similarly only offer WiFi or network connectivity through a phone app generally won’t be the best option. Mostly because there is some output delay since they do their own encoding at a much higher latency cost than what your DeskCamera system can do. IP cameras are designed around accessibility, not real-time pinball streaming.
Here is a table of the sources you’ll want to generate as a reference:
| Component | Resolution | Frame Rate | Description |
|---|---|---|---|
| Pinball table playfield | 1080p | 60 FPS minimum | This is the main overhead shot of the table and what people will be looking at for the most part. Avoiding motion blur is critical to follow play, hence the 60 FPS requirement. |
| Dot Matrix Display (DMD) | 256 x 64, or any 4:1 resolution | 25-30 FPS | The score display so people watching the broadcast can see who wins. |
| LCD | Requirements vary by LCD size. You can use an LVDS to HDMI converter, direct HDMI output (if available) to get a direct feed and exact matching resolution. | 60 FPS | With the inclusion of LCD score display technology in modern tables, having 60 FPS capture is important for animations. |
| Player camera with audio | 720p minimum, 1080p recommended | 30 FPS minimum, 60 FPS recommended | You, along with your audio output so people can actually hear what you have to say. |
GENERAL COMPUTER Hardware REQUIREMENTS
You’re going to want a computer with a fast multi-core CPU, GPU, and 16 GB if not 32 GB of RAM. I would venture that any gaming orientated PC you buy or build is going to work just fine. Notebook computers may also work, although you’ll pay a little bit of a price premium for slightly lower system specs and limited expansion/upgrade options. That’s the trade-off of portability vs. power.
Sorry AMD fans, I’m generally going to recommend an NVIDIA based GPU, simply for the NVENC encoding capabilities that go along with streaming. Being able to encode H.264 with minimal to no impact to CPU or GPU is huge. You’ll also need to make sure your system has sufficient inputs for any camera equipment and capture cards you are using.
So What is DeskCamera Anyways?
DeskCamera (www.deskcamera.com) is the secret sauce in this recipe that makes this whole online dueling pinball thing significantly easier. Essentially the program turns all of your video content into IP cameras directly accessible by the host. I initially had significant issues with DeskCamera when I first started with the 4.4.2 release. The DeskCamera support team was extremely helpful and responsive, and their development team turned around a new point release that addressed all of the major defects I ran into in about a week and a half.
All audio and video content sources in DeskCamera are assigned the generic term of Media Sources in the application. DeskCamera works great because it will create a separate low-delay RTSP stream for each Media Source without having to juggle multiple application instances.
Note: This guide was written using the 4.4.3 version of DeskCamera. YMMV with newer versions.
DeskCamera is commercial app with a trial version that should allow you to do proof of concept testing to make sure your equipment, software, and internet speeds are compatible before making the plunge. Video feeds will have a “Trial” watermark until you have a license, but it should be fully functional for setup and testing.
Provided you’re happy with the software and process, it will cost $80.00 USD for a single perpetual license. For most people, this will be too steep of a price as DeskCamera wasn’t created with a one-off battle/duel stream like this in mind. DeskCamera was created for remotely managing and connecting disparate security systems.

DeskCamera works very well for combined player streaming so George had a great conversation with the DeskCamera sales and marketing teams specifically around producing content in this capacity. He walked them through what we were doing and showed how popular the format was in the Twitch community during the Coronavirus quarantine.
After the discussion, DeskCamera setup a new temporary licensing option for online game streaming. You can now register an account at https://shop.deskcamera.com, and send an E-Mail to gaming@deskcamera.com with a request for a $5.00 USD short term “license for online gaming”. This will grant a user a full license that is valid for fifteen days.
A DeskCamera license is the only thing you’ll need to buy to make this work. Well, other than the cameras, Internet connection, networking equipment, microphones, cabling, computer, lighting, and of course the pinball tables. I’m not counting those because if you’re reading this blog post, you probably already have most or all of this already.
If not, go ahead and get the stuff you’re still missing. I’ll wait…
Main DeskCamera Config – Getting Started
This blog article is going to cover streaming with USB cameras, HDMI cameras, or full computer displays for virtual pinball tables. DeskCamera can do a bit more, which is important for pinball emulation software outside of dedicated cabinets, although that will be covered in Part 2 of this series.
Once you have the DeskCamera software installed and running with a license installed, you’ll see the main configuration screen with the Camera Settings section opened. If you see any entries in the table or the Start button is deactivated, click the “Stop” button to kill the main RTSP services so we can configure your display sources. It should look similar to this when stopped:

With the service stopped, clear out both ONVIF User values and open up the “Video & Audio Settings” section next. This is where the magic happens!
By default, DeskCamera creates a Media Source for each detected display. If you have a USB or HDMI captured camera with a Windows driver, they should show up as additional Media Sources. If you don’t see your connected camera, it may not be compatible with DeskCamera, unfortunately.
For all of the pre-configured Media Sources you don’t intend to use, select each one, change the Live Controller option to “GDI”, click “Yes” for the reset to defaults pop-up, then uncheck the Enable option. All of the unused Media Sources should have a strike-through when you’re done, except for the ones that generate your playfield, DMD, and player streams.
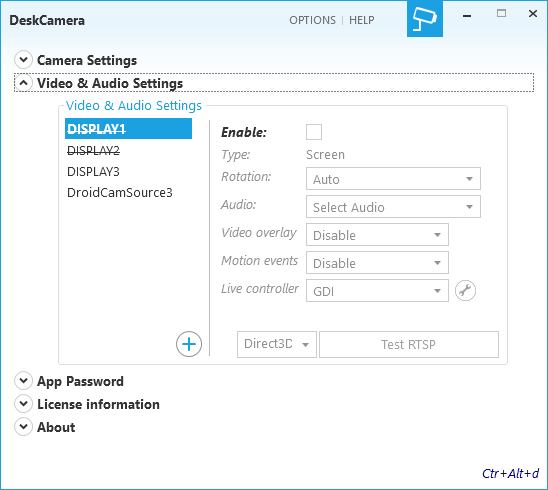
DeskCamera is only going to create an RTSP stream for enabled Media Sources which is good because we don’t want to waste system resources encoding content we don’t intend to use.
Adjusting Primary Media Source Settings
Now that the extra Media Sources are disabled, the automatically created Media Sources need to adjust each stream’s encoding format and quality. Here’s a breakdown of the settings based on the Media Source being a camera or display type:
USB or HDMI Camera Media Source
If you have a USB or HDMI driven source, use these settings:
- Rotation – None
- Audio – Select Audio (For your player camera, select the appropriate audio mic source)
- Video overlay – Disable
- Motion events – Disable
- Live controller – KS video device
Display Media Source
If you are using a full display, use these for the Media Source:
- Rotation – None
- Audio – Select Audio
- Video overlay – Disable
- Motion events – Disable
- Live controller – High performance for a playfield Media Source, GDI for all other display Media Sources (Select Yes for the settings reset pop-up window)
Setting Display Media Source Stream Quality
The last configuration step is dialing in the stream quality for each Media Source, which DeskCamera refers to as Controller configuration. To make these stream quality adjustments, click the wrench icon next to the Live Controller dropdown options, select the “MainStream” entry, if it isn’t already, and use these values:
- Auto GOP: Enable
- Manage by NVR: Disable (Click “yes” for the pop-up after changing)
- Video Encoder: H265 for a High Performance Media Source, otherwise H264
- Resolution: Use resolutions from the RTSP recommendations above
- FPS: 60 for Display playfield Media Sources, 30 for all other Media Sources
- Bitrate: As close as you can get with the slider to these values based on the Media Stream content:
- Playfield: 4096
- DMD: 512
- LCD: 1024
- Player Cam: 1024 or 2048 for resolutions of 720p or 1080p, respectively.
- GOP: (Automatically set)
- Audio Encoder (Player camera only): AAC
Before you ask, DeskCamera will automatically use 60 FPS if your camera or capture device supports the higher frame rate, although it is a higher bandwidth cost like everything else. After you start DeskCamera, you can see what modes DeskCamera supports for your camera(s) by opening the DeskCamera.log file at this default installation path:
C:\ProgramData\DeskCamera\Log\DeskCamera.log
If you get repeated or continual artifacts, smearing, blurring, or other quality issues in the output stream you can’t blame on your camera, you may need to make some upward adjustments to the Bitrate limit values above for the Media Source.

It’s best if the total value of the Bitrate limits across all of your enabled Media Sources doesn’t exceed about 50-70% or so if your total upstream bandwidth of your Internet connection. This is a rough guideline, not gospel. Actual testing between the guest and host is highly recommended, if not a hard requirement. Also make sure you aren’t “double dipping” as a guest during the live stream, i.e. broadcasting video in your Zoom session while streaming RTSP content.
Fire It Up
That’s it, you are ready to roll as a pinball stream guest! Launch DeskCamera, clear out the username and password values if you haven’t already, and click “Start” to launch the camera service. For each of the Media Sources listed, you can click the “i” button to bring up details on the camera stream, open a preview window to check lighting and camera alignment, and most importantly get the URL to access the RTSP content. Click the Copy button for the “MainStream” option for the camera, paste the URL into a text editor, swap the internal IP address for the external IP you get from http://www.whatismyip.com (Don’t remove the “:554” part!), and pass the new URL to the streaming host.
Once the host connects to your stream, provided you didn’t forget something with your network and firewall config, you’ll see the boxes next to the media source names fill up a bit to indicate there are active connections.
Success! Ship it!
Pulling DESKCAMERA’s Content Into OBS As The Host
Scene Configuration for Remote RTSP Media Source
As the host, you just need to add in a media source (un-check local) or a VLC source into your scenes using the RTSP URLs your guests provide, just like you would any other material. The exact steps are going to differ depending on which streaming application you are using.
I’m betting I’ve lost almost everyone with the length of this post as it is. I’ll leave it to George to come up with a future follow-up article on OBS setup (Hint hint).
Syncing Media Content
The last step as host setup will be putting a delay on your local streams to align with the slowest guest content stream, as well as each guest in turn so they also align with the slowest guest’s stream.
It’s Game Time
For the Guests
You’ll want to do a quick final pre-flight capture test shortly before the start of the stream. If the content looks good and the service is running, you only need to watch that the little boxes on your Media Sources slightly fill up in blue indicating someone (Hopefully the host!) has connected to pull the content. Hovering your mouse over the box will give you the IP and socket the remote connection is using.
If you want to see the stream chat, you can either connect to the host stream with your regular streaming software as a guest, have the host do a screenshare of their OBS/XSplit/RTMP software, or other software that can read the real-time chat in the host’s channel.
For the Hosts
As the host, you’ll need to fire up scenes that use the remote content to make sure they display correctly. On game day, if you are confident your scene config is good from earlier testing, I’d still recommend loading scenes just before you start streaming to make sure guest IPs didn’t change. It could also be helpful to open a scene with guest content just before you start streaming so you don’t have temporary blank spots on your scene while some remote streams are loading.
Host and Guest Group Conversation
You’ll want all the guests and host for the stream to also be a part of a group voice call external to the RTSP stream. This can be any app you’d like to use, like Discord, Zoom, WebEx, a phone bridge, or even Teamspeak if you want to go old school. Having a live call allows everyone to communicate in real time since the final stream viewing will be delayed by anywhere between three to thirty seconds. Just remember that your “internal” call and your streaming mic are both going to be hot the whole time, and don’t forget to keep the viewers engaged.
So Long, and Thanks For All the Fish
That’s it, you should have all the tools to get rolling! Part 2 is going to cover a few advanced configuration options, including a bigger focus on using virtual pinball as a guest.

A very sincere thank you to The_Pinsomniac and MPT3K for all of their testing assistance, JediMcMuffin for putting together the layout graphic, and to Andrii with the DeskCamera support team for getting my initial software issues quickly resolved. Also, a special thanks to George from Don’t Panic Flip not only for entertaining my crazy idea and hosting this blog post, but for inspiring me to start the pinball streaming journey. My wife is thrilled!
It’s been my pleasure to walk you through the setup process. I hope this guide has been informative and helpful setting up your pinball duels online with DeskCamera. If not, blame George since this is his blog and he’s editor.
See you next Flipstream…
