Are you quarantined and stuck playing only games from your home arcade?
Are you a streamer or have equipment you could use to stream and want to start streaming and include other streamers INTO your stream (that was a mouth-full)?
Are you looking to try something different (as it relates to streaming)?
If you answered yes or no to any of the above questions, you’re likely reading this article.

Ok, all bad jokes aside, what exactly are we going to accomplish in this article or better yet, what will you be doing in this article? We’re going to do the following with the assumption you’re running Windows:
- Download/Configure/Run an NGINX RTMP server
- Configure your Firewall to Allow Remote RTMP Communication Through your Firewall
- Configure OBS to Incorporate an RTMP Stream as a Media Source into Your OBS Scene
- Confirm All of the Above is Working Using an iPhone App
- Configure a Remote OBS User to Stream to your RTMP Server Instead of Twitch
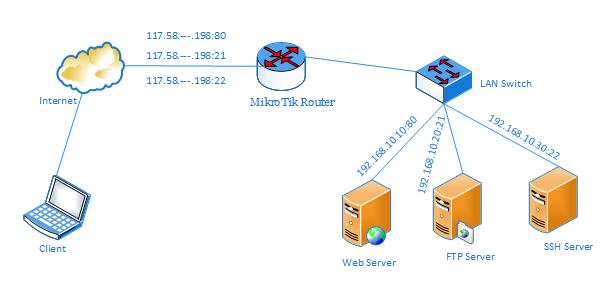
This is the dream, what your setup will eventually look like if you follow these directions:

Thanks to JediMcMuffin for this wonderful graphic!
And this is no small task. It’s a multi-step process with many different moving parts that can fail for any number of reasons. I’ll do my best to identify the most likely reasons for something not to work and suggest what to do to resolve… but you may need to figure things out.
Quick Note About This Being a Work in Progress
I only went through the hassle of figuring this all out on 3/24/2020 while I was stuck in a meeting that I could half-listen to. That night I worked with another streamer (MPT3k) to test everything and eventually streamed our first duel stream a couple of hours later (Who’s Tron Will Reign Supreme!?). I have more duel streams tentatively planned, but this is very early in the process. As I learn more about this and how to improve upon the process, I’ll document those changes and plan a part 2 in another week or two 🙂
Is This The Only Way To Stream With Other Streamers?
No. There are other ways and hopefully we’ll have more articles in the near future that document how to do those with a quick summary at the top of each type’s benefits. So… what are this type of “streaming with other streamers” benefits?
- Benefits
- High quality streams for the master and clients
- Custom integration into an OBS scene(s)
- Disadvantages
- Complicated to figure out and setup
- Somewhat restrictive in OBS scene creation because you don’t have individual access to each streamers camera inputs
- Weird audio delays that need to be figured out
What is NGINX?
NGINX is a very light-weight open source multi-language application and web-server. We will use It to listen to the port we’ll specify (1935) for RTMP connections which will allow us the ability to serve up someone else’s stream as a media source in OBS.
Note: It’s pronounced “Engine X”
While I haven’t tested it yet, NGINX claims to be able to handle multiple incoming RTMP streams with little overhead. I’m looking forward to trying this out as a way to accept incoming audio/video for a commentator on the next duel.
Note: NGINX can do MUCH more than what this article is describing a solution to. Feel free to check out the NGINX Website to see what other applications of the server are available.
Downloading NGINX
This was actually the first real problem for me. Yep, something didn’t work out-the-gate so I’m glad to document here the issue and how I resolved it.
The Problem: The most up-to-date version of the installer for Windows seems to not have the RTMP module pre-installed.
The Solution: Download an older version. I found that the Gryphon installation worked well. Link to Download

You can see that “Gryphon” is quite a bit off of current. Don’t worry, it seems to work just fine with the older version. If you were hoping to use other features from NGINX at the current rev which is “Unicorn” above, then feel free to try and figure it out. And then please let me know and I’ll update this article to use the newest version.
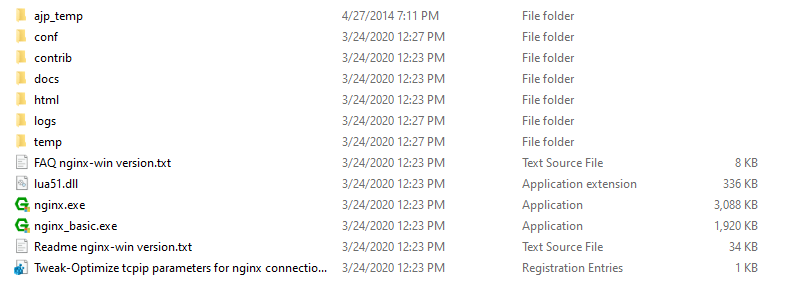
You’ll extract this folder which will create the following structure:
Configuration OF NGINX FOR RTMP
The first change you’ll need to make in this directory is to modify the name of a file in the “conf” directory. You’ll rename the file “nginx-win.conf” to “nginx.conf”. I’m not sure why this wasn’t done in the first place as the executable doesn’t run without this change.
Next up, you’ll need to add the call-out to configure the RTMP server in that same file. Edit the file you just renamed above to “nginx.conf” in your favorite code/script editor.
Note: If you don’t have a code/script editor, I recommend Visual Studio Code.
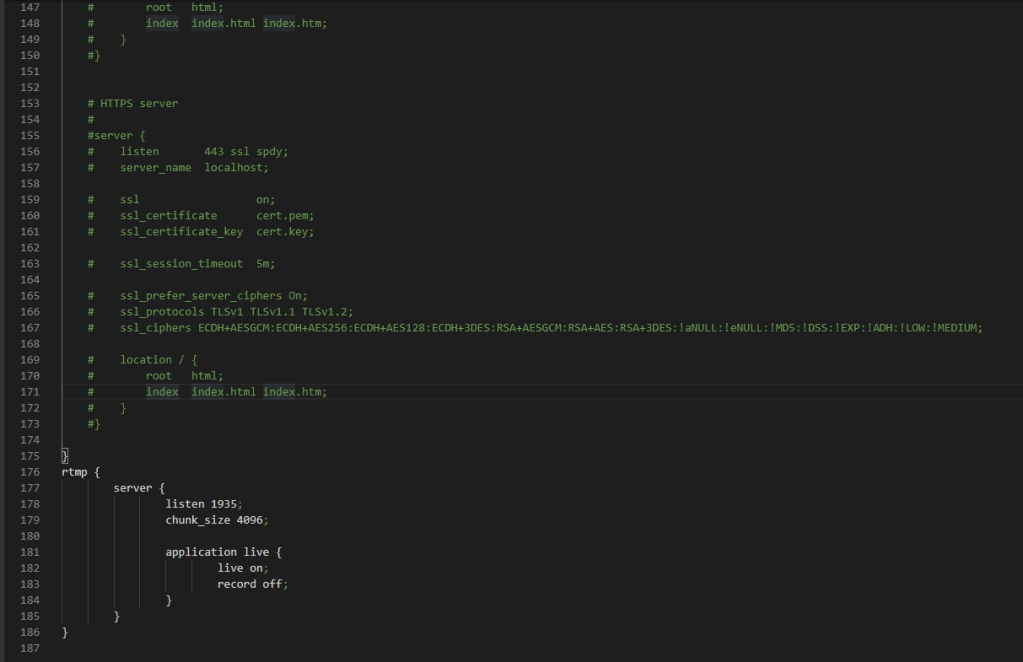
Once you open this file in your favorite code/script editor, scroll to the very bottom and add the following code snippet to the very bottom of the file:
rtmp {
        server {
                listen 1935;
                chunk_size 4096;

                application live {
                        live on;
                        record off;
                }
        }
}
Your nginx.conf file should look something like this:
Save the changes you made to this file and close the editor.
STARTING & Testing NGINX
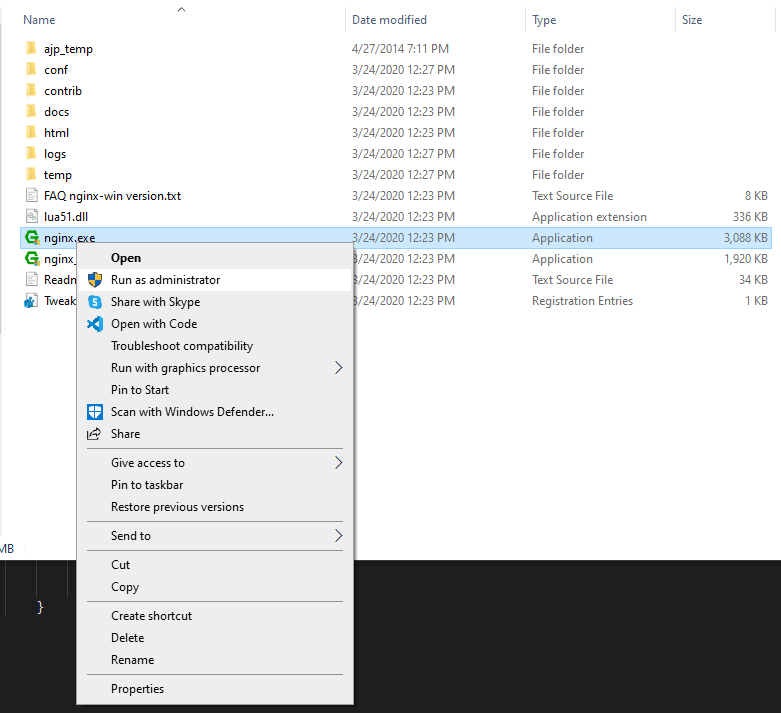
Ok, moment of truth. Let’s go back to the top level of the directory you extracted and run the NGINX.exe as an administrator:
Did your computer blow up? Hopefully not. In fact, you may have seen a command line window pop-up for a moment and then nothing. And that’s good. Let’s confirm that NGINX is running by surfing to the default NGINX webpage using this link: http://localhost
You should see this:
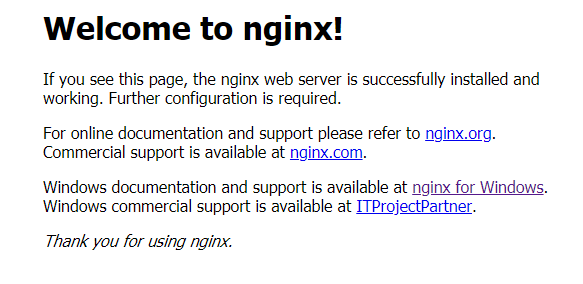
If you don’t see the above image/text when you click the localhost link, don’t fret. It’s likely one of the following issues that needs to be resolved:
- Your firewall may be enabled and blocking access. To confirm, temporarily turn off your firewall and try again. Don’t forget to turn it back on. If it was the firewall, you’ll need to create an exception for port 80.
- You may not have permissions to run NGINX.exe on your computer. Confirm you’re a local administrator on the Windows machine you’re testing this on.
- NGINX may have an issue. If this is the case, check the file at “logs/error.log” for any errors that show up. It’s actually pretty well self documenting and this is how I resolved my own issues.
Assuming you eventually get to the point where you see the success message above from NGINX, we’re going to move on to firewall modifications.
Firewall Considerations

I’m not going to walk you through how to modify your software firewall and your router/modem firewall specifically because every firewall is different and the scope of this article would go on and on and on and on and on and on and on and on and on…
But I will explain what needs to happen so you can make that happen yourself assuming you know enough about networking to be dangerous.
When we’re done, you’re going to have someone outside of your network (and likely physical location) point their OBS at your home’s internet connection (I’m making assumptions about where you are, so feel free to change nouns/adjectives as necessary). Your modem/firewall is assigned one of a limited number of public IP address. We’ll want to forward all connections from the modem/firewall at that public IP address where the port is 1935 (which is what we setup in the configuration NGINX step) to your computer behind your modem/firewall. This is called “Port Forwarding” because we’re forwarding communications from a specified port to another location inside the network.
The next step is to allow port 1935 on your computer’s software firewall. You’ll need to create an exception for this port. Or if you’re like me, you can initially just test everything by disabling your software firewall entirely.
To figure out what your modem’s public IP address is, you can visit WhatIsMyIp from any computer on your network.
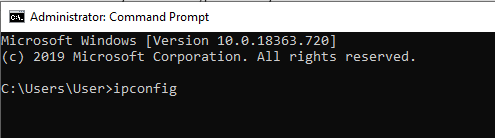
To figure out what your streaming computer’s local IP address is, you can run IPCONFIG from any command line.
Note: This is the most ambiguous section of this article. It’s just too easy to down a rabbit hole of networking so I’m avoiding this particular rabbit hole for now. I was a network administrator for a good chunk of my professional career so I may amend this in the future and add a section on setting up/configuration firewalls 🙂
Configuring An OBS Media Source To Bring In an RTMP Stream Into OBS STUDIO
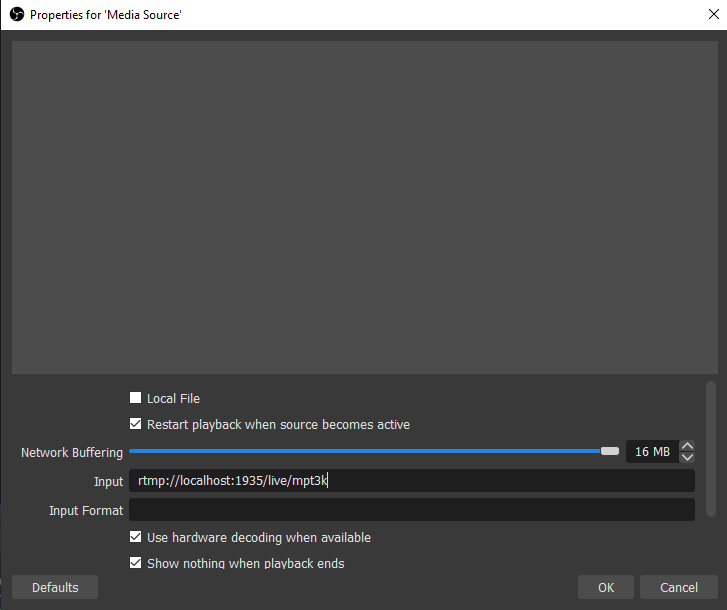
We’re getting close to done and a full-circle test! So don’t give up yet!! Let’s open OBS Studio and add a “Media Source” to a new scene.

Name this media source whatever you want, but remember this is where someone else’s stream will be displayed. Next you’ll uncheck “Local File”, make sure “Restart playback when source becomes active” and set the Input to:
rtmp://localhost:1935/live/thestreamkeyyougivetheotherstreamerYou’re going to have to come up with a unique “key” for the other streamer to submit to you. This can be anything. Because NGINX can receive multiple streams at once, think of this as a unique ID to differentiate between these streams. You’ll replace “thestreamkeyyougivetheotherstreamer” with the key you actually give them. For example, I gave the streamer MPT3k the stream key “mpt3k”.
Click Ok and it should just start working! Psyche!! Lol, nope. Nothing will work because we haven’t setup something to stream to your NGINX server yet. So let’s do that next.
iPhone App Stream SIMULATION
Let’s download an app for the iPhone called “RTMP Live Broadcaster”. This app is free and super simple to use.
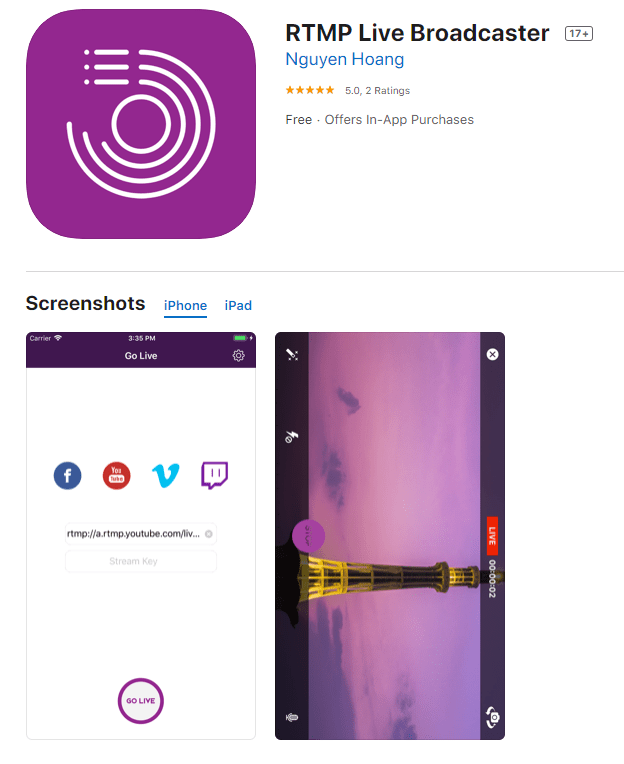
Note: I don’t have an Android device but AJFClark mentioned that the Streamlabs Client app allows similar capabilities and much more.
When you open it, you’ll be prompted to enter a url and a stream key. You’ll want to test it first from inside your network, meaning while your phone is on the same WIFI as your streaming computer. This will confirm your software firewall is functioning without complicating it by going through your modem/firewall. Enter the following URL into the app along with whatever stream key you setup in the OBS Media source step above:
rtmp://YOUR.COMPUTERS.INTERNAL.IPADDRESS:1935/liveThen click the GoLive. This will bring you over to your camera view. You’ll need to click the “Start” button at the bottom and then be patient. Head over to your OBS Studio and wait for the video to show up in OBS.
Did it work? If not, try giving it a good minute before it shows up the first time. Next, try STOP and START again on the phone app. Lastly, hide/show the source in OBS and give it a good minute.
Next up, perform the same test from your phone but turn off your WIFI and try it from your wireless providers network. You’ll need to update the URL in the phone app to target your EXTERNAL IP ADDRESS that you checked from an earlier step using WhatIsMyIp. Perform the same steps and confirm it works!
You’re now ready to accept a stream from another streamer.
Configure a Remote OBS User to Stream to your RTMP Server Instead of Twitch
You’re ready to receive a stream from someone else. You’ll need to walk them through changing the target of their stream from Twitch (or whatever) to your RTMP server by switching to custom and inputting an RTMP URL and a stream key. You’ll give them the same information you just tested using the iPhone app above when off your wireless network:
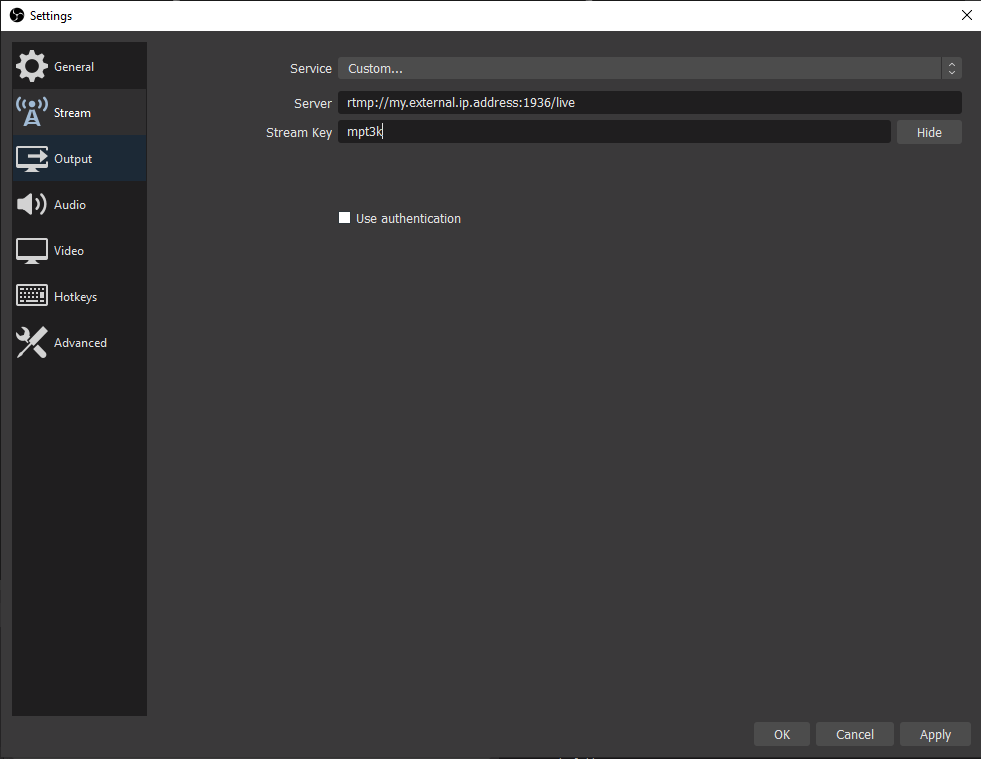
Have them enter this information, save, and click “Start Streaming”. This will send their stream to your RTMP server, and OBS will pick it up and display it on your stream like any other source! Remember that this sometimes takes up to 60 seconds for the stream to first show up. Be patient.
And have fun combining streams! It definitely took some figuring out, but creating a dual ‘L’ shaped scene to better simulate a cohesive interface was worth it:


Definitely check your audio levels and make sure when you’re talking at a normal voice from the distance you’ll end up streaming that your both hitting the same spots on the levels bars. And do a bunch of testing before you go live for real! Switch scenes, check your frame rates, look at your CPU usage, etc…
You’re doing the thing!
You’re streaming with multiple streamers! Enjoy the fact that you made it through all of that to get here. Have a beverage of some sort to celebrate.
To reiterate what was mentioned at the beginning, there are other ways to “Stream with other streamers” and we’ll post articles about those as we test each out. In my opinion, the biggest benefit of this method (RTMP with NGINX) is the quality of the stream you’ll receive from other streamers. The biggest disadvantage is trying to sync audio via the delay… which we’ll be testing different ways of doing this over the weekend and hopefully a well documented way to do it will be the focus of part 2 along with designing a good “duel” stream layout.
Good luck and may the force be with you!
Want to Check Out Part 2 Where We Discuss Lessons Learned?
If you made it through part 1 and want to continue on to part 2, check it out here on OBS and NGINX Part 2
