
Or how I learned to avoid the technical pitfalls of NGINX, OBS, the internet, and everything…
What Streaming With Others Can Look Like When Done Right

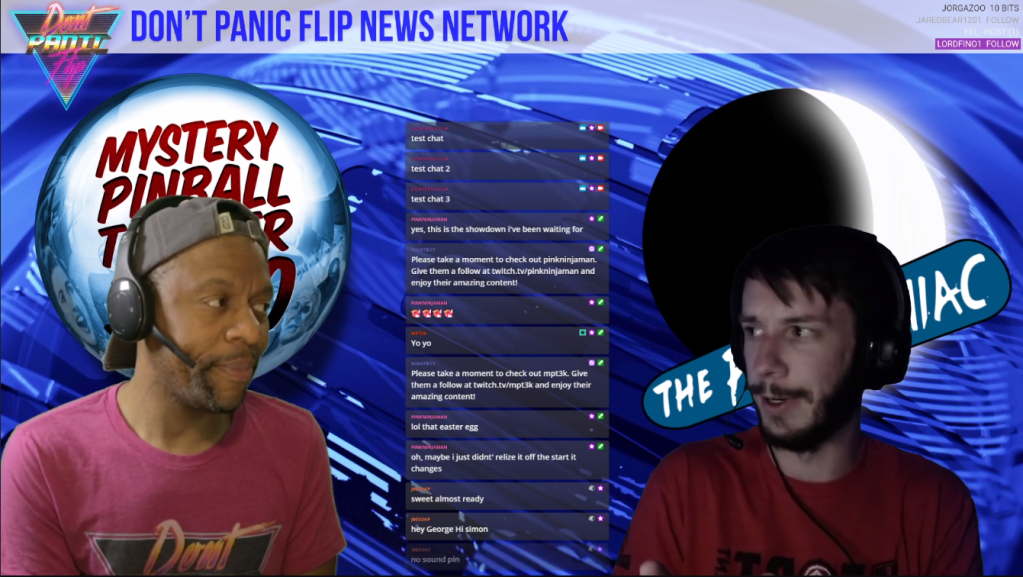
In our Twitch Stream on 4/9/2020, we hosted a total of 4 different streamers all streaming at 1080/60 from 4 different locations in the world. (2) from Colorado, (1) from California, and (1) from Germany! Both commentators sent their stream with a green screen intact which allowed me (the Twitch broadcasters) to remove their backgrounds and integrate their streams with an animated looping background to better simulate a news style broadcast.
But none of this came easily or worked perfectly out of the box. In fact, we spent a little over an hour and a half getting our last stream setup before the stream started promptly at 10:30PM MT. And it came down to the wire.
So if you’re looking for something easy to setup, configure, and get working… NGINX is DEFINITELY NOT what you’re looking for. I hope to have a few articles in the near future documenting options that simplify the process of streaming with others.
But If you’re technically savvy, are looking for a way to achieve a stream at native visual/audio quality, with the ability to create a cohesive look and feel, then this method works and IS exactly for you.
a HUGE Thank You to Everyone That Helped Out
This was a truly MASSIVE team effort from multiple streamers all staying up way too late to test out different options and changes to our streams to see what worked and didn’t work. Here they are, and please give each of them a Follow/Subscribe/Like if you’re not doing so already on their respective Twitch/YouTube/Facebook/Twitter accounts:
- Mystery Pinball Theater 3000
- The Pinsomniac
- Flipstream
- StubsXmas
Are you Supposed to Be Here?
Did you read OBS and NGINX Part I? If not, you should probably head over there and start with that article before proceeding. Just a suggestion. Carry on…
What Went Wrong with NGINX and OBS?

Let’s identify real quick all of the issues we encountered in our first 3 streams with multiple streamers:
- Crashing OBS
- Inconsistent Internet Bandwidth
- Latency
In this article, I’ll discuss each of these issues and how we addressed them specifically to reduce the number of issues experienced mid-stream. And you’ll see a progression from stream 1 to stream 4 using NGINX as we hammer out each of these issues individually and finally bring them together in stream 4 with WeLovePinball, The_Pinsomniac, and MPT3k:
- Stream 1 – Tron duel between Don’t Panic Flip and MPT3k
- Stream 2 – TNA duel between Don’t Panic Flip and MPT3k
- Stream 3 – Jurassic Park duel between Don’t Panic Flip and JediMcMuffin
- Stream 4 – Jurassic Park duel between Don’t Panic Flip and WeLovePinball
- Stream 5 – TNA duel between Don’t Panic Flip and MPT3k (Rematch)
Crashing OBS
What could go wrong with the OBS sources and general layout so much that it would crash? I’m glad you asked 🙂

We started by using a non-local media source that referenced our RTMP stream but that inherently had an issue we couldn’t work around. Once it connected, it never stopped being connected. Even when “Restart playback when source becomes active” was checked and it was made “not visible”, it was still connected to the source! In some ways, this was great but people’s internet during the pandemic can become quite unreliable and often when disconnected (even for a short period of time), this would cause the source to crash and never come back up because it would never restart.
Note: I think this may be a bug in the current version of OBS (25.0.4).
We switched to VLC video sources. VLC sources have an option under “Visibility Behavior” that specifies: Stop when not visible, restart when visible. And this actually works as expected! If we lost someone and they didn’t naturally come back online, we could hide and then show their source in OBS and that usually brought them back up.
But… and this is a HUGE BUT, VLC sources do not like to be disabled temporarily when things are working right. Imagine switching scenes from your intro to your main view. While in your intro scene, the sources are not active and the connection is dropped. That meant when you switched to a scene with VLC sources it may take 10-15 seconds before the sources come online if at all. Sometimes this scene switch caused all of the other OBS streamer’s streams to crash. This required manually killing the OBS process in task-manager and restarting OBS before the stream would show up again.
Note: There is usually a period of 15-30 seconds after a fresh VLC or media source connection where the everything “stabilizes”. During that time, the image/audio can become intermittently bad but after a brief period seems to resolve itself nicely.
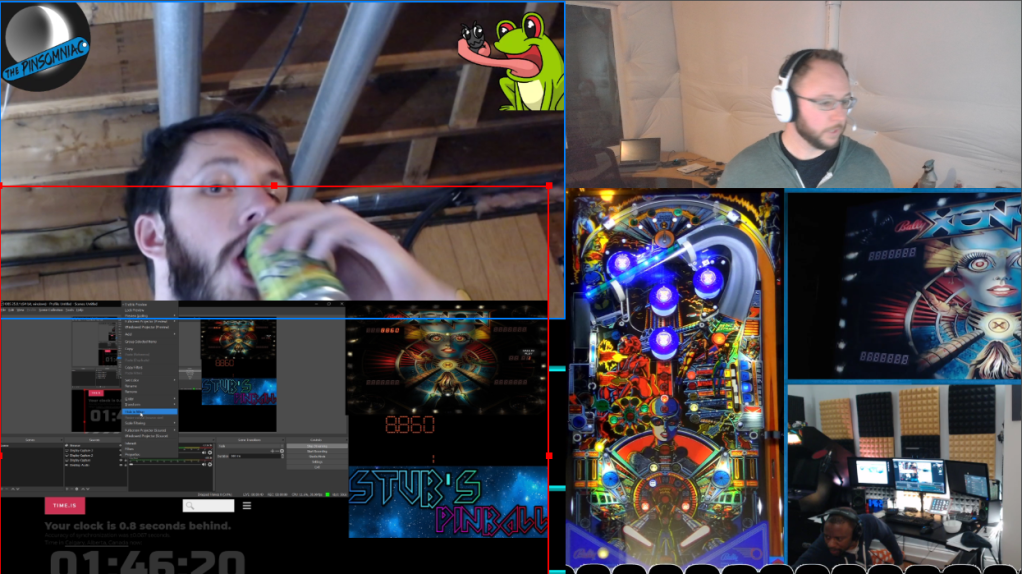
How did we overcome this? We put copied references to each VLC in every scene of the OBS scene collection. You can put the VLCs you don’t want visible behind your background so they aren’t seen and make sure to mute the audio when you don’t want those specific VLCs heard. This is kind of a low budget hack but it worked and I could move easily between all my scenes without killing the NGINX connections between my OBS scenes and their RTMP streams.
Here’s examples of Pinsomniac, MPT3k, StubsXmas, an I all figuring this out and setting things up to switch scenes without killing each other’s streams.

Inconsistent Internet Bandwidth
This is always going to be an issue but one that is exacerbated by the current internet usage due to the pandemic. While everyone and their mother is binge watching The Golden Girls, we’re stuck with limited upload/download for silly things like pinball streaming. Grr…
How did that affect our streams? I was hosting the NGINX server on my computer (which is quite beefy), and in periods where my internet bandwidth sagged, the stream suffered. In some case, the streamers lost connection to the NGINX server which forced them to once again, kill the OBS process on their computers and restart OBS. This could be quite devastating on-stream so we opted to move NGINX off of my computer (regardless of beefiness, we needed a good dedicated connection) and I created a VM (virtual machine) on AWS (Amazon Web Services).

This benefited me a few ways. First, it moved the biggest weak-point of the NGINX streaming system from my computer and people connecting through my mediocre firewall/router, through my network to my laptop… up into the cloud behind commercial grade hardware and an internet connection with enough bandwidth to shove a country’s worth of content through it.
No more dropped connections… no more inconsistent bandwidth from the side of the server. If there was an issue streaming, it was an issue with the streamer not the server’s hardware or internet connection.

Thanks to JediMcMuffin for the above graphic!
Note: This is a solution to a problem we experienced but maybe not recommended for everyone. You can continue to host your NGINX on your own network at no cost.
Additional Note: I don’t intend to walk anyone through setting up a VM in AWS, but for the few people who are interested in trying it, you should know that you can sign-up for a 1-year-free account with AWS so you don’t have to pay anything to test this out.
Latency
This is the single biggest issue we faced during all 4 of our streams. What do I mean by latency? The lag between each individual’s streams. In a perfect world, NGINX and the RTMP module would have a setting to sync everyone’s incoming streams to a single clock source. Unfortunately, this does not exist… yet.
Note: If you’d like to help push the open-source community to prioritize this functionality, please head over to the GitHub project and comment that you’d like to see a solution to this issue or click Thumbs Up.
Did we solve the problem another way? Eh, kind of. We tackled this issue 2 different ways.
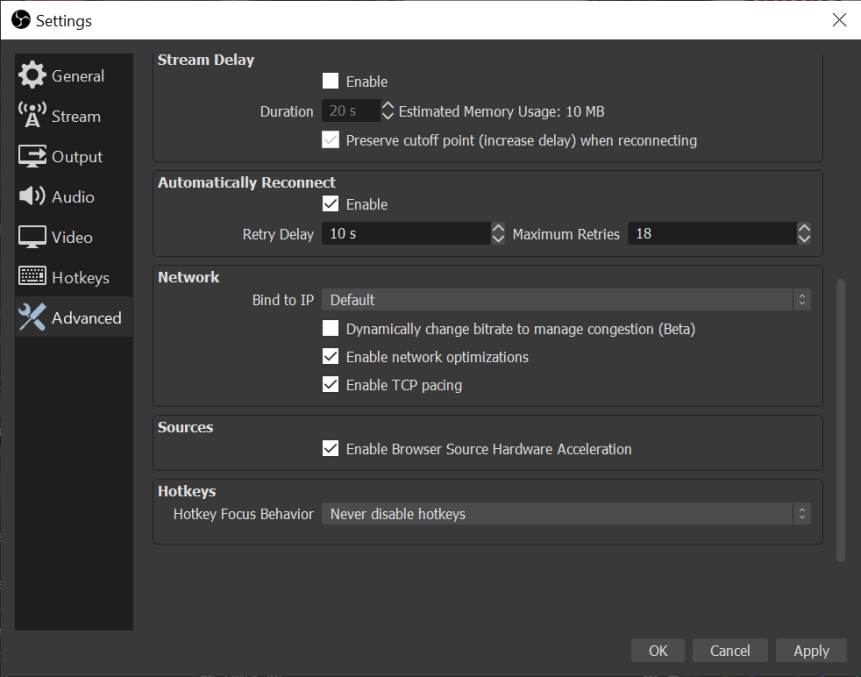
First, we adjust OBS to decrease the amount of latency/delay/lag it creates. And you’d be surprised by how much is introduced by OBS. Any processing that OBS does takes time, so the goal is to minimize that as much as possible by tuning OBS for low-latency and network optimization. During testing, we cut our delay by more than 50% in most cases (from 3-4 seconds down to 1.5 – 2 seconds). Here are the settings we adjusted and suggest you change to reduce latency when using NGINX to stream with others:
In OBS Settings –> Advanced –> Scroll to the Network section and check “Enable Network Optimizations” and “Enable TCP Pacing”.
Now go to Settings –> Output and if you’re using the x264 encoder, select “zerolatency” from the “Tune” options. Additionally, make sure your CPU usage is set to fast or very fast.

Note: If you’re using a different encoder (NVENC, NVENC (new)), adjust any settings available for low-latency. NVENC encoders have an option for low-latency as well.
Changing these settings will reduce the overall amount of time it takes to transmit your stream to NGINX and the overall amount of latency the master streamer has to deal with. But be warned, you’re tuning the parameters that adjust how OBS outputs your stream. This may cause the quality to drop or your CPU/Graphics CPU to be used differently. Keep an eye on your system performance to make sure you don’t peg anything at 100%.
Note: If you want everything to go back to the way it was before you started messing with settings, I suggest you take a few screenshots.
Second, There WILL be latency. No matter what. So how do you deal with it?
The tricky part and the second change you can make to deal with latency is to add “Render Delays” to the incoming streams, and your video/audio to match the slowest member of your multi-stream. This is not ideal but it will get your stream into the realm of “no noticeable latency” if no one person is significantly behind the others. In our 4th stream with WeLovePinball, Simon was in Germany and due to his physical location, even with the above changes he still experienced 7 seconds of latency as compared to everyone else!
How did we solve that? It was a multi-step process:
First, we each brought up a browser source in our streams and pointed it to “http://time.is”.
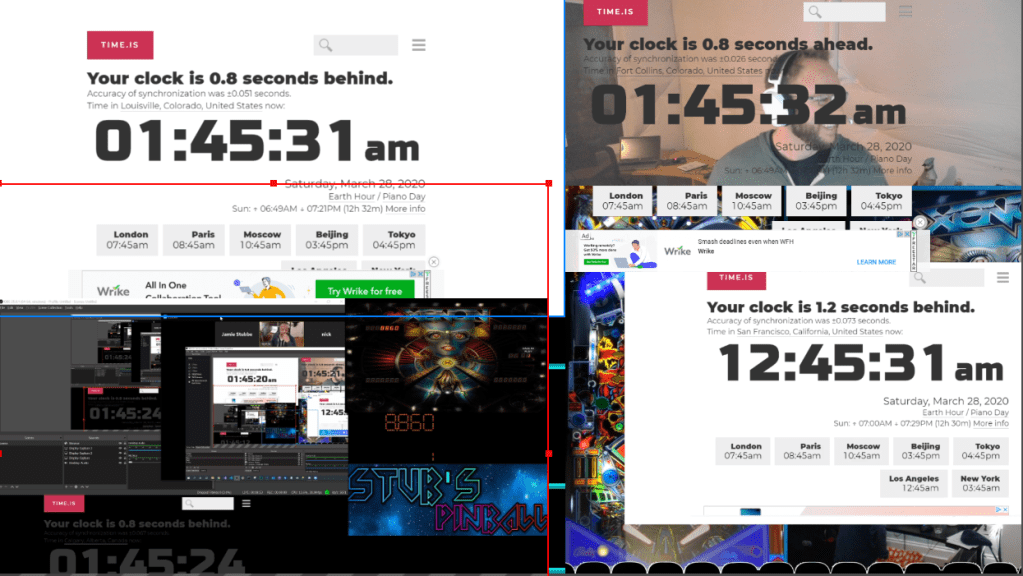
This allowed the master streamer (me) to see what kind of latency each incoming streamer was experiencing as their stream was pulling into my OBS. Once the NGINX server was moved to AWS (Amazon Web Services), the latency became fairly consistent for everyone involved. Unless you were streaming from another continent! I was able to see that WeLovePinball was experiencing 7 seconds of delay and MPT3k/The_Pinsomniac were both experiencing 2 seconds of delay.
Second, MPT3k and The_Pinsomniac stopped streaming (this is important as making changes live can sometimes break things) and added 5 seconds of “Stream Delay” to their output using a full stream render delay in the Settings –> Advanced –> Stream Delay section:

Once that was done, they both started streaming again and after a few moments I could see their streams AND their time.is browser sources and now MPT3k, The_Pinsomniac, and WeLovePinball were all within about 1 second of one another. Perfect!
But now I needed to change my output to be in-sync with WeLovePinball without adding additional render delay to everyone. I couldn’t use the same Stream Delay option above because that would push everyone’s delay back 7 seconds which would put all of the other streamers at a 14 second delay and me at 7.
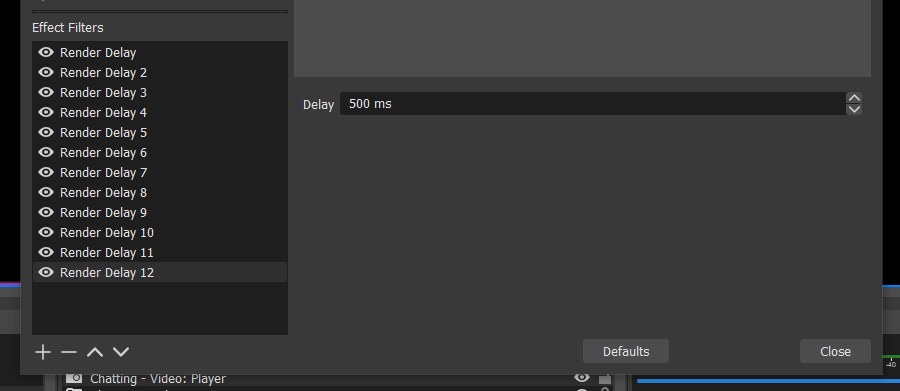
I added a render delay instead to each of my cameras and both my desktop and microphone audio. If you just “sighed”, I get it and I did too. And it gets worse because for some reason, OBS’s render delay on a media source only allows a maximum of 500ms to be added at one time. But they stack… so get ready to add 14 render delays to 3 different cameras sources!!

From the master streamer’s OBS, right click on the first camera source and select “Filters”.
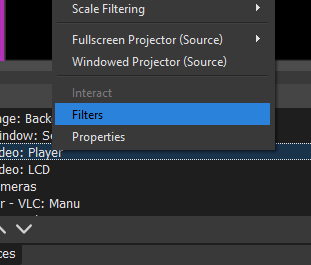
From here, you’ll add a new filter of type “Render Delay”:

From here, you’ll add a delay of 500ms (that’s 1/2 a second). You may be tempted to put something in quite larger, but alas… 500ms is the current maximum 😦
Wash. Rinse. Repeat until you have the desired number of seconds of render delay total. And then repeat for each of your camera sources.
Next up, you’ll need to delay your audio for your desktop and microphone. This is much easier. Open your “Audio Mixer” in OBS (if it’s not already open), and click on the cog icon for any of the sources. You’ll select “Advanced Audio Properties”:

From this next window, you’ll find both your Desktop Audio and Mic/Aux and set the “Sync Offset” to the desired number of ms (remember that 1000ms = 1 second):

And now you’ve successfully delayed your video/audio to be consistent with the other incoming streams!
In Summary
NGINX and OBS as a tool to stream with other streamers is a combination that works and once it’s configured, it can provide a level of cohesive high quality streaming you can’t yet achieve in other products. But it is a PAIN IN THE BUTT to get running and keep running and the latency issue is really just like putting a newspaper over a dogs recent accident in the house rather than cleaning it up. We could really use something to automatically sync the streams in OBS or at the NGINX level.
Who knows, maybe our request on Git Hub or some classy programmer will come up with a solution that warrants a 3rd article detailing how to automate synchronized remote streams 🙂 I certainly hope so.
If you somehow made it through this article but didn’t read OBS and NGINX Part 1, you should probably start over with that and then read this. It may make more (or less) sense.
